Mosaic-Look Wall Stickers: Plan and Apply Your Accent
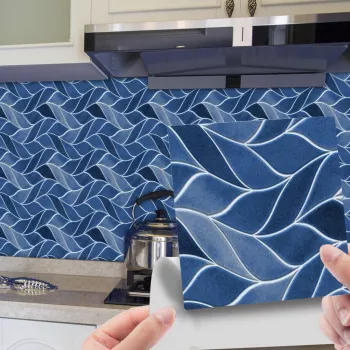
A small wall update can change the feel of a room without turning your weekend into a tile project. Our Mosaic Tile Paste Self-Adhesive Wall Stickers – Decorative PVC Decor let you add a mosaic-inspired accent to a suitable wall without setting individual tiles or applying grout. The best results start before you peel off the backing: choose the right location, map out the pattern, and make sure the wall is ready.
Where a mosaic accent works best
Give the pattern a defined place to live. A section of wall above a desk, the back of a reading nook, or a decorative border can bring in detail without competing with everything else in the room. If you are unsure how much pattern you want, start with a compact area rather than planning to cover an entire wall.
The surface matters as much as the location. Look for a wall that is smooth, clean, dry, and firmly finished. Heavy texture can leave gaps beneath a sticker, while dust, grease, loose paint, or peeling finishes can weaken the bond. A sticker cannot repair an unstable wall surface; address the underlying issue first.
Keep these PVC stickers in the decorative category. They are not ceramic tile, grout, or a protective wall covering for a spot that regularly faces splashes, steam, or heat. If condensation keeps returning, choose a drier accent area instead of covering the problem. The EPA’s guide to mold and moisture explains why controlling the source of moisture matters.
Plan the placement before peeling
Measure the area you want to decorate and decide where the pattern will begin and end. A visible edge, such as the side of a desk or the corner of a nook, can serve as a reference point. Lay the pieces out with their backing still on so you can compare the pattern at joins and see whether a corner will need special attention.
Step back and view your proposed placement from the doorway as well as from up close. Will the accent look centered relative to nearby furniture? Does the pattern stop at a deliberate point? Making those decisions now is easier than trying to adjust an adhesive piece after it is pressed down.
| Check | Look for | Why it matters |
|---|---|---|
| Surface | Smooth, firmly finished wall | Provides more even adhesive contact |
| Cleanliness | No dust, grease, or loose paint | Helps avoid weak spots beneath the sticker |
| Moisture | Dry location without recurring condensation | Reduces the chance of moisture affecting the finish |
| Layout | Measured edges and a starting point | Helps keep the pattern visually straight |
If one of these checks raises doubts, you do not have to abandon the idea. Move the accent to a smoother, drier section of wall. A smaller placement in a better location is more useful than a larger one on a surface that may not hold it well.
Apply with a steady hand
Clean the wall in a way that is appropriate for its finish, then let it dry completely. If it was recently painted, follow the paint manufacturer’s guidance on when adhesive decor can be applied. Before covering a large area, try an inconspicuous spot to see how the adhesive interacts with the finish.
Begin at the reference edge you chose during layout. Peel back a small section of the backing, position the sticker, and press that section into place. Continue removing the backing gradually while smoothing outward with your hand to limit trapped air. Avoid pulling or stretching the material to make an edge reach; revisit the alignment if a piece does not sit where you expected.
Pause after each piece and look across the pattern. Small shifts are easier to notice and address as you go than after the whole accent is covered. Press along edges and corners, where a lifted section is most noticeable, without using excessive force on the wall finish. Work at a pace that lets you keep your starting line straight.
Choose the right kind of mosaic project
Our self-adhesive wall stickers are a choice for a decorative refresh. They do not call for a separate “mosaic paste,” mortar, or grout. If your goal is a durable tiled surface—particularly one that must handle water or heat—plan it as an actual tile installation rather than asking a decorative sticker to do that job.
For ceramic or glass mosaics, the right setting material depends on the tile, substrate, and exposure conditions. Follow the tile and setting-material manufacturers’ instructions; the Tile Council of North America FAQ is another resource for understanding tile-installation questions. Do not assume one adhesive works for every mosaic project.
Once your accent is in place, keep care gentle and avoid abrasive scrubbing. If you notice dampness developing on or behind the wall, deal with its cause rather than hiding it under more decor. And if you like to map small home projects alongside your other goals, our Ultimate Productivity Blueprint is a separate digital planning guide—not an installation guide or a material needed for these stickers.
FAQ
What is the best adhesive for mosaic tile?
For real mosaic tile, choose an adhesive specified for the tile material, substrate, and exposure conditions, following the manufacturers’ instructions. These self-adhesive decorative wall stickers do not need separate tile adhesive.
How to make mosaic paste?
You do not need to make paste for self-adhesive wall stickers. For an actual mosaic tile project, use a setting material formulated for the tile and location, and follow its mixing instructions rather than relying on a homemade paste.















Leave a comment